
It’s not uncommon for resin to have a rough edge after you remove it from a silicone mold. This is because resin tends to shrink slightly as it cures. The resin in the center of the mold will contract, while a small amount of resin will remain around the edges of your mold. After taking your piece out of the mold, this edge can feel sharp.
Depending on what you’re using the resin for, rough edges might not be an issue. However, sharp edges can be a problem if you’re making jewelry, keychains, and other resin projects that will be handled frequently. Fortunately, it’s super easy to remove rough resin edges! This blog explains an easy process for sanding resin and we’ve also included tips for polishing your finished object to make it really shine.

When to Sand Resin
Epoxy resin crafts can be sanded whenever you want to smooth out an area or take off a rough edge. This can be for aesthetic purposes or for comfort. For example, you may need to sand the edges of a bangle to make it feel more comfortable on your wrist. Resin objects made in 3-D molds often need to be sanded as well. These molds may leave ridges or spurs that need to be removed from your finished piece.
In any case, you only want to sand resin after it has become fully cured and hard. While you might be able to remove hard resin from a mold after 12 hours of cure time, you don’t necessarily want to sand the piece immediately. Depending on the size of the piece, it may take several days for the resin to reach its maximum hardness. Sanding resin before it fully cures can warp or otherwise damage the piece.
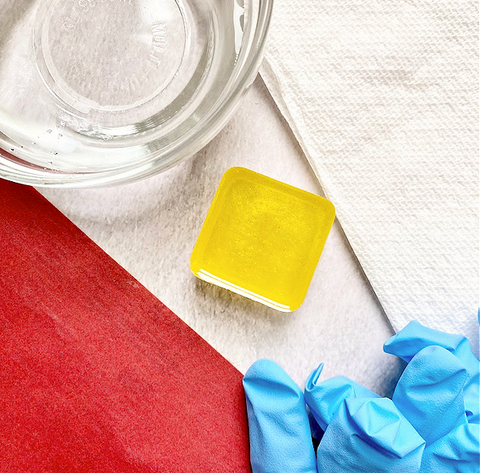
Supplies for Sanding Resin
To sand resin pieces, you basically only need sandpaper, water, gloves, and a mask. Because you will need to keep the resin piece wet throughout the sanding process, it may help to have a bowl or other dish that you can dip your piece into. You may also want an old towel to cover your workspace and keep it clean.
As for sandpaper, you will want to have several different “grits” ranging from around 200 grit to 1,000 grit. Sandpaper grit numbers refer to how abrasive the paper is. For example, 200 grit sandpaper has larger particles and is therefore more abrasive than 1,000 grit sandpaper. You will ideally want 3-4 different grits. For example, 200-grit, 400-grit, 600-grit, or 1,000-grit, etc.
If you plan on doing a small amount of sanding, regular sandpaper is usually sufficient. However, if you are sanding a large area, you may want to opt for waterproof sandpaper instead. This type of sandpaper will hold up better with the wet sanding method (covered below).
When using the wet sanding method, most of the dust will be trapped by the water instead of becoming airborne. However, we still recommend wearing a dust mask or respirator mask. You do not want to breathe in any resin dust.

Steps for Sanding Resin
To sand resin, you will move from rough sandpaper to finer sandpaper until your piece is smooth. The finer-grit papers will make the edge smooth while also minimizing any scratches created by the rougher papers.
- Create a clean workspace. You might want to cover the area with paper or an old towel to make cleanup easier.
- Get the resin piece wet. You will want to keep it wet the whole time you are working.
- Place the 200-grit sandpaper (or your lowest grit number) on a flat surface.
- Begin moving the resin piece over the surface of the sandpaper, focusing only on areas that need to be smoothed off. To prevent scratches on the smooth areas of the resin, avoid letting these parts touch the sandpaper. If it’s easier, you can pick up the sandpaper and move it over the surface of the resin instead of rubbing the resin on the paper.
- Re-wet the resin as soon as it dries out to prevent dust from becoming airborne.
- When the edge is sufficiently smoothed off, move to a finer piece of sandpaper (e.g. 400-grit) and continue working the area.
- Repeat this process with finer sandpaper (e.g. 600, 800, or 1,000-grit paper) until the edge is smoothed to your liking.
Wet-sanding resin is a good method because it prevents dust. However, sandpaper will get clogged more quickly with the wet sanding method. If you want to dry-sand your resin, be sure to wear a respirator mask and wear eye protection. You do not want to breathe resin dust or get debris in your eyes.

How to Polish Resin
Sanding resin is necessary for removing unwanted rough edges, but it’s hard to get a shiny, glass-like appearance with sandpaper alone. And while sanding is often needed, it can create scratches and a cloudy appearance on your final piece.
To get a shiny, clear finish, you may want to polish your resin after sanding it. There are several methods polishing resin, but one of the easiest ways is to simply use a polishing medium and a cloth. The best kind of polishing medium can vary depending on the type of project you are making.
For small pieces such as keychains, jewelry, coasters, paperweights, and similar items, many resin crafters like using Flitz Polish. This type of polish is available at most hardware stores. To use, simply dispense a small amount of polish onto a microfiber cloth and rub it over the surface of your resin piece. For best results, you will need to use a little elbow grease. Continue polishing until your resin has the glossy appearance you want.
Check out our collection of resin supplies for all your crafting needs!
2 comments
Hi Jerry, thanks for your comment. The tips in this article should work for sanding the edge lines and fill hole. You’ll want to make sure to polish the resin afterwards to remove roughness. I’d recommend making a small piece first to see how the sanding technique works for you.
Our resin (and most A&B resin) is best suited for projects that are smaller than 10 oz / 300 grams in size. For a large spherical mold you might want to use a resin specifically designed for that purpose. I hope this helps. Thanks!
I’ve been reading a lot about how to do Resin. I want to use it for my own style of art work. I have a 2-14” round ball. Do I use A & B or use deep pour. And how do I remove edge lines or top of a fill hole? Thank you